Thursday, April 12, 2012

New Product Challenge: Adhesive Springs

My upline sent out a New Product Challenge to her 1st and 2nd downline. We were to use the new Adhesive Springs in a project, and she even kindly provided us some Adhesive Springs to use. I hadn't ordered those yet, so I was excited to see what they were like in person. I guess I was thinking they would be used kind of like the 3-D Foam Tape, but not really -- the spring can be pushed pretty darn flat. It will really 'pop' when a card is opened. So here's my answer to the challenge!

Front of the card:


Inside of the card:
Link

I used patterned paper from the Footloose Paper Packet with the stamp sets A Rainbow (clouds), Just Chillin' (sun), and Card Chatter-Sympathy (sentiment). All the stamping was done in Desert Sand ink. I actually used some 3-D Foam Tape on the front to add some dimension to the clouds, but then on the inside I used an Adhesive Spring to make the sun really pop when the card is opened. Then I added some Blue & Green Sparkles for a touch of embellishments.

I thought it turned out pretty cute! What do you think? :-)

Dani

Tuesday, April 10, 2012

Convention 2012: Dallas, Texas!

I'm thrilled to share that I am teaching again at Extravaganza at convention this year. I just found out last week, and I don't even know what I am teaching yet. :-) This will be my tenth year with Close To My Heart, so I am really excited! It got me thinking, that the very first convention I ever attended was in Texas as well -- back in 2004. I was still nursing Kyle, so the whole family attended. I got out my album from that convention, and here is a picture of how little my kids were then:


Can we all say, "Aaaaaaaaaaaw!" It doesn't even seem possible that they were that little. Seriously! For comparison, check out this picture from Easter this year:


My kids are growing up too fast. :-(

Dani


Thursday, March 8, 2012

March SOM: Potential

I finally found some time to make some art with March's gorgeous Stamp of the Month set: Potential. I had been saving some pictures from Pinterest where I simply loved the color combinations, and I got them out and made some cards with the pictures as inspiration.

My first card's colors were inspired by this picture:


My Close To My Heart colors were Sunset, Cranberry, Creme Brulee and Pacifica. I random stamped the flourish stamps in Cranberry on the Sunset cardstock. Then I stamped the larger circle design, Creme Brulee on Creme Brulee cardstock, cut it out and mounted it on Pacifica cardstock. Then I stamped the sentiment, "We're in this Together" on a strip of Cranberry cardstock, attached everything and added a couple of embellishments from the new Pacifica Mini-Medley Accents collection. They are definitely not colors I would have chosen to use together on my own, but I love how the card came together.


The second card's colors were inspired by this picture:


I used the Close To My Heart colors Grey Wool, Lagoon and Sunset. Using Grey Wool as my background, I stamped the larger circle design Lagoon on Lagoon cardstock and cut out, then the smaller circle design Sunset on Sunset cardstock and cut it out. I layered and attached them to the card, stamped the sentiment "Anything is Possible" in Grey Wool, and added the Grey Opaques and a butterfly sponged in Grey Wool from the Flutter Paper Shapes pack. Clean and simple, but so cute.


My next card's colors were inspired by this picture:


Aren't these colors just yummy together? I used Close To My Heart's Grey Wool, Cranberry, Buttercup and Sunflower. I stamped the large flourish on the bottom in Sunflower on Buttercup cardstock. Then I attached a strip of Grey Wool cardstock to the top and stamped the sentiment "We're in this Together" in Cranberry. My embellishments were some Cranberry ribbon and red Sparkles with some Sunflower sponged little flowers.


My last card's colors were inspired with this picture:


My Close To My Heart colors used were Outdoor Denim, White Daisy and Sunset. It's not hard to tell that orange is an "in" color, since I used Sunset on three of my four cards!!! Since I had gone with tone-on-tone stamping with the other circular designs, I decided to try to dress this one up more. I stamped the larger circular design on White Daisy in Sunse, cut it out and mounted it on some Outdoor Denim cardstock. Then using the Outdoor Denim marker, I added some outlining and little dots. I attached an Outdoor Denim print from the Victory Paper packet on the left side, with a small strip of Sunset cardstock on the right. I then stamped the sentiment "Anything is Possible" -- first masking "is Possible" and stamping "Anything" in Sunset, then masking "is Possible" and stamping "Anything" in Outdoor Denim on White Cardstock. My embellishments were an Outdoor Denim ribbon with Dark Blue Sparkles.


I think I need to save more awesome color combinations from Pinterest! I simply love how these cards turned out. :-)

Enjoy!
Dani


Wednesday, February 22, 2012

Playing Around with Trends!

I finally found some more time to play with my new stuff from the Spring/Summer 2012 Idea Book! LOVE THEM! I was trying to play around with some of the trends I've been seeing around lately too.

Here's my take on the "rainbow" trend. I used the adorable butterfly from the new set A Garden (just one of several new A-size sets!), and the sentiment from March's upcoming Stamp of the Month set, Potential. I colored the edge of the butterflies' wings with the markers (left to right): Tulip, Sunset, Sunny Yellow, Pear, Sky, Gypsy and Cotton Candy. Then I filled in the inside of the butterflies' wings with small polka dogs made with our Black marker. Too cute! I loved how they turned out. The paper is a print from the new Stella paper packet, and I added some black polka dots to it as well to tie everything together.


Then I was playing around with some of the hot color trends. I am lovin' the yellow/grey combination right now. This card was one of the make-n-takes at the Open House, and everyone thought it was adorable. The colors are Grey Wool and Honey. I cut the cute little banner pieces with our Cricut Art Philosophy cartridge, of course, and strung them on our brand new Baker's Twine -- the Grey Wool from the Neutral Assortment. I think our new Baker's Twine assortments are my favorite new embellishments! I used the sets Bingo Alphabet and the sentiment from A Tree along with Diverse Backgrounds. I used the polka dot pattern from Diverse Backgrounds to stamp the butterfly. The paper is a print from the new Pemberley Paper Packet.


Another color trend I played around with is the new brights, especially with orange! This one also is a take on the color block fad that is so hot right now. I used Sunset, Cotton Candy and Sunflower, and I must have selected a good combination as my daughter adored these colors (orange is her favorite color). I wanted chunky blocks with my color, and I used a sentiment from the upcoming July Stamp of the Month set, Live Out Loud. I added some bling with our Rhinestone designer brads and the new Sparkles Flourishes. I've used similar products from other companies to our Sparkles Flourishes before and some have been difficult to apply, keeping the shape. These went on so easy, and I had no problems keeping those beautiful graceful flourishes when attaching them to the card.


Another trend that is hot right now is mixing patterns! I personally, have always loved to do that anyway, so it was a lot of fun to put together this scrapbook page. I used a print each from the new paper packs Stella and Lucy as well as from the Typeset paper pack. I know many of you are scared to mix patterns (if they aren't already matched together in a paper pack), but don't be afraid to "mix things up" and grab different patterns from different packs! One of the main things to pay attention to is the scale of the pattern -- make sure that you are balancing out a large, bold pattern with a smaller print -- have some contrast. Here I chose my colors from the photo, but if you have an underlying color in all the patterns that will also help you blend your patterns together in a visually pleasing way. Trust me, it's fun! Make sure to try it. I went to town with a lot of embellishments on this page. The title is using the Eclectic Alphabet chipboard letters, with resist patterns on them! All I had to do was sponge on the Cotton Candy ink. Then I used some more Baker's Twine, sewing a border around the edge, this time with the Lagoon color from the Paradise Assortment. Then that led me to getting out the new Paradise Paper Flowers, which coordinated so well with everything else. Then to keep the embellishments from getting too visually overwhelming (and overshadowing the sweet photograph, which I did not want)... I kept all the remaining embellishments pewter-colored. I pulled some accents from our Pewter Mini-Medley Accents Collection, as well as using our Pin Clips and new Pewter Badge Buttons.


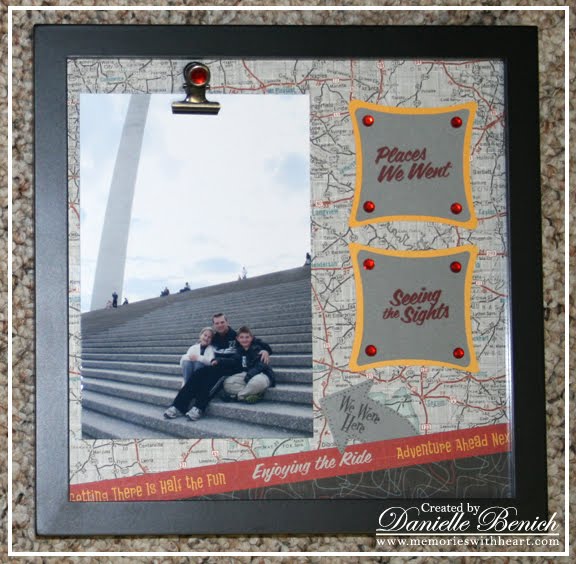
And, last but not least, I was so happy to see the map print in our new paper pack Cruisin'! I have seen so many cute projects with maps, that I knew I had to make something with that print. I ended up getting out a square frame that fit an 8"x8" design. Using sentiments from our new Adventure USA stamp set, more from the Cruisin' paper pack and an arrow from the Cricut Art Philosophy cartridge, I created an 8"x8" layout to fit behind the glass. I made sure to leave room for a regular 4"x6" photo. Then I used one of our new Binder Clips and hot glued it to the outside of the glass! Then, since it seems you can never have enough bling, I added a sparkle to the Binder Clip to tie it in with the sparkles in the layout. Now, I can easily switch out the photo in a snap so I can show our latest trip without having to take apart the entire frame. Nice, huh?


If you haven't yet gotten your new Spring/Summer 2012 Idea Book, what are you waiting for? There is way too much in this one to miss out on, so make sure to contact me today. :-)

Dani

Wednesday, February 8, 2012

Open House!

An Open House Celebration
for the new Spring/Summer 2012 Idea Book!
Saturday, February 11th -- 9:00am - 2:00pm


It's here, it's here -- our brand new Spring/Summer 2012 Idea Book!

There will be:

•New product and artwork on display

•Free make-n-take projects, below is a picture of one project:


•A small selection of "take home today" products, specially priced

•Open House only specials

•Door Prizes & Grand Prize Basket

•Light snacks & refreshments

There are eight new gorgeous paper kits: Stella (shown on cover), Pemberly, Lucy, Victory, Footloose, Superhero, Florentine, and Cruisin'. There are a whoppin' forty-five brand new stamp sets, including 11 absolutely adorable A-size sets (they're only $6.95 each!). And the new embellishments are phenomenal, including some Baker's Twine (which I love!). This and so much more...

Make sure to stop by to get YOUR *FREE* Spring/Summer 2012 Idea Book!!!

Dani


Saturday, December 31, 2011

Fundraiser for the LAM Foundation!

As most of you already know, I was diagnosed with LAM a few years ago. It has been a bit of a roller coaster since then, but through it all, the LAM Foundation has always provided unmeasurable support and has been instrumental in their ongoing fight for a treatment and cure for LAM. UPDATE: I have extended the fundraiser for one more month! From January 1-29, 2012 From February 1-29, 2012, I am donating 20% of all sales from an online gathering to the LAM Foundation. Since this is an online gathering, it is easy for everyone to browse and purchase whatever they want and have it shipped directly to them.

Here is the link to a web page with all the details, where you can start shopping right away and even invite a friend: Fundraiser for the LAM Foundation.

I have also created a few cards to share for some ideas on what you could create, complete with a list of supplies (simply click on the image for more information). Each card has a basic version as well as a version with more of a creative kick. I hope you enjoy them!


If you have any questions on how any of these cards were made, don't hesitate to ask. There are a few items which are retiring at the end of January, so make sure to order what you want while you can. I did update the supply lists to reflect what items did retire at the end of January. Again, please ask if you have any questions!!!

Dani

Monday, December 12, 2011

The 12 Days of Christmas Specials!

The 12 Days of Christmas Specials are in full swing! We're going to have fun with a different special every day until Christmas Eve. You can participate in one or all of the specials, but you'll have to let me know THAT day if you want the special (via phone or email).

IMPORTANT: At the end of The 12 Days of Christmas Specials, I will total your entire order for you. If there are enough orders for Hostess Rewards, I will also draw for Hostess Goodies. If your name is drawn, you'll have until Thursday, December 29th to let me know what you want for your goodies in order to get everyone's orders placed in a timely manner.

Don't forget to check your email (if you're not on my email list and would like to be, just let me know) or this blog to see what the daily 12 Days of Christmas Special is!!!

Twelfth Day of Christmas special: Saturday, December 24th!

Have a wonderful holiday season!

Dani

It's Christmas Gifts time!!!

We've been busy making some homemade Christmas gifts, which of course, I can't really share too much. However, we did give Kyle's librarian her gift already so I can share those! I help out at the library in the elementary, and one day I was helping her trim her tree and decorate a bit for Christmas. She didn't seem to have any ornaments that were for reading or books, so Kyle and I decided she needed some little "books" for her tree.


We ended up making her five little book ornaments. Kyle selected all the series to include: Harry Potter, Fablehaven, Redwall, Magic Tree House, and Percy Jackson. :-) They turned out so cute! They are a miniature book made from a small pad of sticky notes! Then I just raided my scrap paper drawer to decorate them up. If you'd like to make some mock little books, the directions I used can be found here. Here is a shot of the entire tree with our book ornaments on them.


I'll try to share some more as gifts are handed out to the recipients!

Dani

Monday, November 14, 2011

More Cricut Fun with CTMH's Art Philosophy Collection!

The cold weather is bringing me down, so I decided to take a break and craft a bit -- and I needed some bright and cheery colors! :-)

First, I made a fun card with the Art Philosophy Seasons stamp set, that comes bundled with the cartridge. I used the "christmas tree" stamp and cut-out as a banner on a party card. I went with a rainbow effect using Topiary, Sunflower, Sorbet, Tulip, Gypsy and Pacifica colors. Add some ribbon and a little bling with the "It's a Party" sentiment from the Art Philosophy Celebration stamp set, and it's finished! Does that lift your spirits or what?


I loved the colors so much with the Kraft cardstock as the background, that I decided to keep playing with the same color scheme. This time around however, I made a mini-card set. I made a set of six 3"x3" cards with matching envelopes and even a cute little holder for all of them. I selected a basic shape for each card from the Art Philosophy cartridge and then added texture and design with the Unscripted stamp set. I also cut out a coordinating envelope for each card with the cartridge too.


Last, but not least, I cut out a little card holder and decorated it up to match to hold the entire set.


Mission accomplished: spirits lifted!

Dani

Friday, October 21, 2011

Halloween 2010 Mini Album!

Waaaaay back over the summer, I said I'd post more of my artwork from teaching at convention... but you know how things go. :-) There is never enough time! (* sigh *) But considering this month is October with Halloween coming up soon, I decided to post close-up pictures of the kids' mini-album from last year's Halloween.

The mini-album is our My Creations All-Sorts Mini Album, with the Fanfare papers, and one of last year's stamp of the month set D1442 Thriller. I pulled the journaling from a Family Blog post from last Halloween. You should be able to click on any of the pictures to see a larger picture.

COVER:


SPREAD 1:


SPREAD 2:


SPREAD 3:


SPREAD 4:


SPREAD 5:


BACK:


Sorry for the slight glares and shadows, I just quickly snapped these pictures out in the back yard. I wonder who will be visiting us this year at Halloween? :-)

Dani


Wednesday, October 5, 2011

Christmas Card Workshop!


Get all your Christmas cards done in a snap. Go home with beautiful handmade cards -- ten each of two to four designs of your choice. As always, most everything is pre-cut and ready to assemble. This workshop is done in an assembly line fashion, in order to make ten of each design in a timely manner. In order to keep the overlap of supplies used to a minimum, each card design can only be used twice. Designs will be chosen on a first-come, first-serve basis -- so sign up now to get your favorite designs.

For a downloadable flyer of the workshop (pdf format), please click here. To see a close-up of all the individual designs available, please click here.

It has been quite a while since I've held a workshop (due to being diagnosed with a chronic illness and subsequently adjusting to it), so I'm going to go over a few basics regarding this Christmas Card Workshop for everyone who is new or as a gentle reminder for everyone else. :-)

  • How many cards can I make? You can decide to make 20, 30 or 40 cards. Your choice! Simply select 2, 3 or 4 designs, and your cost is adjusted accordingly.
  • What size are the cards? All the cards are a standard size (4-1/4"x5-1/2") and come with envelopes.
  • Why are the designs limited to two people each workshop? Designs are limited to keep the overlap of supplies used to a minimum, in order to keep the workshop moving since we are making ten of each design.
  • Do I have to cut all the individual pieces? Most everything is pre-cut and ready to assemble, except where noted on the individual design sheet (mainly if you are stamping and then cutting something out).
  • Why do you need a RSVP date? The RSVP date is the last day to reserve your spot and get the payment for the workshop to me. I need time to order the supplies, get them back to me, and then get everything cut and ready to go for the workshop.
  • Why are workshop fees non-refundable? I am ordering multiple quantities of lots of supplies. I simply can't afford such a large quantity of supplies or need such a quantity myself. If for some reason you are unable to attend, the kit will be packaged for you to finish at your own convenience or a make-up date can be arranged.
  • What happens if the class fills up? I do keep an eye on how many people are participating, to ensure there is enough space for everyone to work comfortably. If the dates fill up, I'll simply open another date/time.
  • Can a group of people schedule their own workshop? Sure! Simply contact me, and we'll work on finding a date/time mutually convenient.
  • Can I bring my child(ren) to the event? These workshops are fun "me-times" for many people, so please make other arrangements for childcare. (Breastfeeding babies are an exception.)
  • Can my child(ren) sign up for the workshop? If they are at least a teenager and able to work on their projects without assistance.

If you have any more questions, please don't hesitate to ask! I hope to see you all at the Christmas Card Workshop!

Dani

Saturday, October 1, 2011

Woo-hoo! I placed in three categories!

Close To My Heart runs a contest for consultants with each new Idea Book. I am excited that I placed in three categories! I also received my very own "blog badge" from CTMH for the first time ever to help share the good news. :-)


Nice, isn't it? I like it! You can click the link above, and it should take you to see all the winning art!

I placed in the Cricut Dreamin' category:


The Cricut Wonderland category:


And the November Stamp of the Month category:


Yeah! So excited! Thanks for letting me share!

Dani