Tuesday, July 17, 2012

Back from Texas!!!

We made it back from our long drive to Texas, and I no longer have to keep all my teaching for Extravaganza secret!!!  :-)  Woo-hoo!  I'm going to have all my art out for an Open House celebrating the brand new Autumn/Winter 2012 Idea Book, which goes live August 1st!


An Open House Celebration
for the new Autumn/Winter 2012 Idea Book!
Saturday, August 4th -- 9:00am - 2:00pm


There will be:


-TONS of new artwork and product on display
-Free make-n-take projects
-A small selection of "take home today" products, specially priced
-Open House only specials
-Door Prizes & Grand Prize Basket
-Light snacks and refreshments


Make sure to stop by to get YOUR *FREE* Autumn/Winter 2012 Idea Book!!!

I was assigned the new Flirty paper for teaching at Extravaganza:


As well as given a prototype of the brand new Cricut© Cartridge coming out: the Cricut© Artiste Collection!  Woo-hoo!  I can't wait until you guys can get this:


You are definitely going to love it!  It is filled with over 700 shapes, a plethora of 3D items and projects!!!  You can easily create everything you need to celebrate almost any occasion.  As before, this collection is a bundle which includes three exclusive stamp sets and three sets of Dimensional Elements -- all of which coordinate with the Cricut© Artiste shapes for mix-and match fun.  And for even more excitement, there are also new stamps that coordinate with the Cricut© Art Philosophy collection too.  Forty percent of our stamp sets now coordinate with a Cricut© cartridge - THAT IS AWESOME!

In addition to Flirty, there are seven more gorgeous paper kits: Avonlea, Clementine, Dakota, La Belle Vie, Scholastic, Moonlight, and Pear & Partridge. There are an incredible 62 new stamp sets, some exciting brand-new products, stunning new embellishments, and so much more!  I can't wait for you to see everything.

Somehow, my amazing husband was able to pack and bring back my artwork so I could share it with all of you (we were VERY squishy in the car back from Texas), with only a few oops:


I will make sure to fix up everything the best that I can, so that you can 'ooh and ahh' away at the Open House at all my hard work that I wasn't able to share with you earlier.  :-)  I'll go ahead and share one piece of art, so you can see something completely brand new.  This is the layout that I created with the photograph of my daughter Delaney that I shared earlier:


It's hard to believe that she is thirteen years old already.  In my head sometimes, she's still the little girl who liked to dress up in Disney Princess clothes.  :-)

I also received a little gift from Close To My Heart in the mail, celebrating 10 years as a consultant.  Can you believe it?  My hubby nicely already put it on my CTMH charm bracelet for me.


Sorry the picture isn't any better, but I just snapped it myself and no matter what I did... I could only get two of the charms to show at once.  :-) 

Then, I still can't believe that Delaney agreed to do this, but I thought it might be fun to share all my teaching aprons I've received at convention.  (She is modeling all of them for us.)  This year is my all-time favorite, filled with ruffles and bling -- you definitely can't go wrong! 

Dallas, Texas - Convention 2012
 

Anaheim, California - Convention 2011

Orlando, Florida - Convention 2008


Salt Lake City, Utah - Convention 2006

 
Las Vegas, Nevada - Convention 2005


Dallas, Texas - Convention 2004


And I even have one that I'm not quite sure where I got it from:


??? I'm not sure if we could just order it, or if it was from San Diego, California - Leadership 2007?  A fun trip down memory lane...

Dani


Tuesday, June 19, 2012

Lots of creativeness!

I still can't share any of my convention art yet unfortunately, but I can share other creative projects!  First, I'd like to share a clay dragon that Delaney made at the very end of the school year.  She worked really hard on this project, and I think it is simply adorable!


Delaney and I are loving the nice weather and have been having fun again painting our toenails with fun designs.  Right now, Delaney has rainbow-colored, polka dots while I have a coral color with chunky glitter tips (my glitter is hard to see in the photo unfortunately).


And last, but not least, Close To My Heart did something really fun and exciting for everyone who is attending convention this year.  We were given a fun little instructional packet, walking us through creating five different Studio J® layouts -- best of all, they were FREE!  They had to be finished by this past Monday, and with our crazy schedule, it was a bit difficult getting them finished along with everything else... but I squeezed by under the deadline.  Since these are all using current products, I can share them!  Here's my Studio J® layouts for convention:


It was a lot of fun creating these!  I'll receive the final print outs at convention when I register.  I love papercrafting too much to completely switch to digital scrapbooking, but there are a lot of benefits to using Studio J®. 

     - There are some fun adjustments that you can make digitally, that are simply impossible to do with regular papercrafting.  You can resize your stickers, use unlimited embellishments simply by copying and pasting another, color embellishments to any color in the kit, layer and create your own unique embellishments without any bulk, add journaling in any color, automatically line up and space out embellishments, and much more!

     - There are extra scrapbooking kits to select from on Studio J® - including exclusive kits only available through Studio J® as well as some retired sets!

     - If you've been designated the official scrapbooker for your family or an event, this is perfect!  You create the layout once, and then simply print out as many as you need for everyone to receive their own copy.  There is no need to recreate the exact layout multiple times!

     - It's a FREE service!  There are no sign-up fees, no digital kits or software to buy.  You pay nothing for using the online software; you only pay when you order your layouts (and there are great discounts for doing those in multiples as well as a Studio J® membership too)!

     - You could scrapbook anytime, anywhere if you'd like!  There is no need to pack a bunch of supplies, anywhere you have internet access -- you can digitally scrapbook with Studio J®.

     - These are just the benefits that I can think of right now; I'm sure there are lots more!

If you haven't tried it yet, make sure to head over to Studio J® and play around with it.  You can play as much as you'd like at no cost, the only fee will occur if you decide to print your layout.  If you'd like to try to create the layouts we were able to for convention, here are the instructions.  It pretty much tells you step by step what to do, very simple, and then you can put your own twist on things for your final projects -- like I did!

Have fun and keep creating!

Dani


Thursday, June 14, 2012

Just over a year ago...

It was just over a year ago that we had a horrible storm swing through our area. It was not a tornado apparently, due to the fact there was no evidence of rotating winds... but it sure seemed like it. It was pretty darn scary while we were in it, and it left behind quite a mess. I ended up making a mini-album of the storm that was part of my convention art last year. I thought it would be a good time to share it:


And I have been busy, busy, busy working on all my convention art. I wish that I could share something with you, but I can't! :-( 'Bout all I can do is share a lovely picture of Delaney that is in one of my scrapbook pages. I can hardly believe she is 13 sometimes, until you see a picture like this. I can't wait to share the entire layout!


Hopefully once I get done with all this convention stuff, I can share some art again. :-)

Dani

Thursday, May 31, 2012

Stampaganza is back!


It's back, it's back -- everyone's favorite special... Stampaganza!  Buy two stamp sets and get one free in June!*  For every two My Acrylix stamp sets (sizes A, B, C, D, or E) you purchase at full retail price, you'll receive a third stamp set of your choice FREE* (of equal or lesser value) of up to $29.95 per set!
*Please see the flyer for all the specifics of the special.

This is a great time to get those stamp sets you've been wanting, host a gathering or even a book party to get the most bang for your buck!  And, of course, if your subtotal is over $50 you can also get June's adorable Stamp of the Month set Life is Tweet for only an additional $5!  I LOVE this stamp set.  I was going to make a couple of cards to share with you guys, but I was having so much fun with it that I ended up with four cards to share.  Enjoy!!!

Dani


Monday, May 14, 2012

Latest Project: Mother's Day Gift!

Here's a project that I finished not too long ago, but since it was a gift for my mom for Mother's Day... I couldn't share it until now!  My mom loves to play Scrabble or most any word game for that matter: Bananagrams, Perquackey, etc.... so I thought I'd make something for her with that theme in mind.  Using a garage-sale find Scrabble board (thanks to our friend Doug!), I created a wall-hanging.  I used an online crossword puzzle maker to create a puzzle with words describing my mom.  I made her do the crossword puzzle first, then gave her the finished piece.  :-)  I created all the flowers and leaves with the Close To My Heart's Art Philosophy Cricut Cartridge to help decorate up the finished piece.  It was a lot of fun; I will have to play around with some more Scrabble art! 


If you've made anything with an old Scrabble board or pieces, I'd love to see them!

Dani
 

Friday, May 11, 2012

May's Stamp of the Month: Friendship Bouquet

It has been so crazy time-wise with the end of school coming up. The kids only have 13 more days of actual school left!!! Can you believe it? There have been a few days, where I wonder if we'll make it. :-)  But I finally sat down to make a few cards with this beautiful set.

The first card I messed around with some masking and stamped the entire background with flowers in Chocolate.  Yes, I started with a plain, white card base!  Then I just used our watercolor pencils, and slowly but surely colored it in.  I took my time and added more color a layer at a time.  Then the last thing I did, was add a few black dots in the center with a black marker.  It was fun, but took a while and my hand was cramping when I was finally finished.


This next card was my attempt to make it look more like a typical daisy.  I used patterned paper in the background of the flower, stamped the flower directly on it with Black ink, then stamped it again on White Daisy paper.  Then I carefully cut out just the flower part and attached it on top of the patterned paper stamp, after using a light blue coloring pencil for a few shadows.  Then after coloring the center and stem in, it was finished.  My card base was in a Goldrush color to match the center of the flower.  It really makes the white flower pop with the patterned paper in the background.


And the last card I was able to make, I decided to paper piece the flowers from the Footloose paper pack.  The only coloring I did here, was to use the Chocolate marker in the centers of the flowers.  I did have to fussy cut out the flowers, but the flowers look so pretty with the patterned paper.  Adding a small little mock-banner with the sentiment, then a few opaques, and viola -- it is finished.  Cute, simple and very quick -- especially compared with my first one which was all coloring!!!


I was having so much fun playing with the set, that I was wanting to mess around with it some more but unfortunately I ran out of time.  Off to the next project!

Dani

Monday, April 16, 2012

Dotty for You!


Starting Tuesday, April 17th -- let's celebrate National Scrapbooking Month with the exclusive, absolutely gorgeous Dotty for You paper packet. This paper packet is filled with trendy colors and stunning patterns. You will definitely not want to miss this special!


We have chevrons, stripes, butterflies and oh so much more -- and THAT is just on the front side. The back sides are a subtle tone-on-tone dotted pattern, just perfect to coordinate with all the front patterns. I thought they were beautiful when I saw the flyer, but in person, they are simply amazing.

I had a little bit of time to make a few cards, and I could hardly decide what patterns to use... I wanted to use them all!


I even played around with this month's stamp of the month set, You Are... with a couple of the cards. Aren't these fun? You can order online at any time or contact me for personalized service. Make sure to get your Dotty for You papers today, while you still can!

Dani

Thursday, April 12, 2012

New Product Challenge: Adhesive Springs

My upline sent out a New Product Challenge to her 1st and 2nd downline. We were to use the new Adhesive Springs in a project, and she even kindly provided us some Adhesive Springs to use. I hadn't ordered those yet, so I was excited to see what they were like in person. I guess I was thinking they would be used kind of like the 3-D Foam Tape, but not really -- the spring can be pushed pretty darn flat. It will really 'pop' when a card is opened. So here's my answer to the challenge!

Front of the card:


Inside of the card:
Link

I used patterned paper from the Footloose Paper Packet with the stamp sets A Rainbow (clouds), Just Chillin' (sun), and Card Chatter-Sympathy (sentiment). All the stamping was done in Desert Sand ink. I actually used some 3-D Foam Tape on the front to add some dimension to the clouds, but then on the inside I used an Adhesive Spring to make the sun really pop when the card is opened. Then I added some Blue & Green Sparkles for a touch of embellishments.

I thought it turned out pretty cute! What do you think? :-)

Dani

Tuesday, April 10, 2012

Convention 2012: Dallas, Texas!

I'm thrilled to share that I am teaching again at Extravaganza at convention this year. I just found out last week, and I don't even know what I am teaching yet. :-) This will be my tenth year with Close To My Heart, so I am really excited! It got me thinking, that the very first convention I ever attended was in Texas as well -- back in 2004. I was still nursing Kyle, so the whole family attended. I got out my album from that convention, and here is a picture of how little my kids were then:


Can we all say, "Aaaaaaaaaaaw!" It doesn't even seem possible that they were that little. Seriously! For comparison, check out this picture from Easter this year:


My kids are growing up too fast. :-(

Dani


Thursday, March 8, 2012

March SOM: Potential

I finally found some time to make some art with March's gorgeous Stamp of the Month set: Potential. I had been saving some pictures from Pinterest where I simply loved the color combinations, and I got them out and made some cards with the pictures as inspiration.

My first card's colors were inspired by this picture:


My Close To My Heart colors were Sunset, Cranberry, Creme Brulee and Pacifica. I random stamped the flourish stamps in Cranberry on the Sunset cardstock. Then I stamped the larger circle design, Creme Brulee on Creme Brulee cardstock, cut it out and mounted it on Pacifica cardstock. Then I stamped the sentiment, "We're in this Together" on a strip of Cranberry cardstock, attached everything and added a couple of embellishments from the new Pacifica Mini-Medley Accents collection. They are definitely not colors I would have chosen to use together on my own, but I love how the card came together.


The second card's colors were inspired by this picture:


I used the Close To My Heart colors Grey Wool, Lagoon and Sunset. Using Grey Wool as my background, I stamped the larger circle design Lagoon on Lagoon cardstock and cut out, then the smaller circle design Sunset on Sunset cardstock and cut it out. I layered and attached them to the card, stamped the sentiment "Anything is Possible" in Grey Wool, and added the Grey Opaques and a butterfly sponged in Grey Wool from the Flutter Paper Shapes pack. Clean and simple, but so cute.


My next card's colors were inspired by this picture:


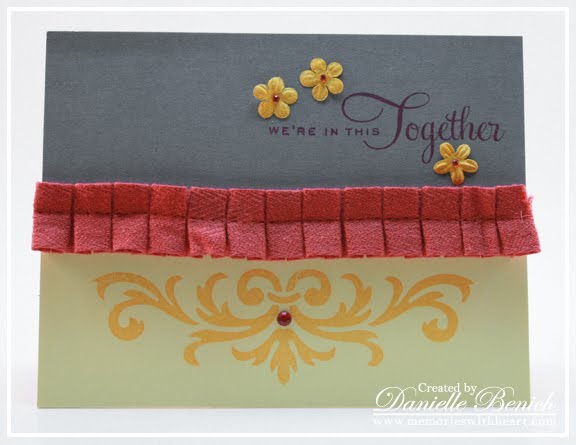
Aren't these colors just yummy together? I used Close To My Heart's Grey Wool, Cranberry, Buttercup and Sunflower. I stamped the large flourish on the bottom in Sunflower on Buttercup cardstock. Then I attached a strip of Grey Wool cardstock to the top and stamped the sentiment "We're in this Together" in Cranberry. My embellishments were some Cranberry ribbon and red Sparkles with some Sunflower sponged little flowers.


My last card's colors were inspired with this picture:


My Close To My Heart colors used were Outdoor Denim, White Daisy and Sunset. It's not hard to tell that orange is an "in" color, since I used Sunset on three of my four cards!!! Since I had gone with tone-on-tone stamping with the other circular designs, I decided to try to dress this one up more. I stamped the larger circular design on White Daisy in Sunse, cut it out and mounted it on some Outdoor Denim cardstock. Then using the Outdoor Denim marker, I added some outlining and little dots. I attached an Outdoor Denim print from the Victory Paper packet on the left side, with a small strip of Sunset cardstock on the right. I then stamped the sentiment "Anything is Possible" -- first masking "is Possible" and stamping "Anything" in Sunset, then masking "is Possible" and stamping "Anything" in Outdoor Denim on White Cardstock. My embellishments were an Outdoor Denim ribbon with Dark Blue Sparkles.


I think I need to save more awesome color combinations from Pinterest! I simply love how these cards turned out. :-)

Enjoy!
Dani